Apple Pay – An attempt to demystify – Take 2

Earlier, a couple of months ago, I attempted to demystify ApplePay in this blog post. Those were the early days when most of us didn’t have access to enough information on its inner workings. Even with such limited information, many parts of the post turned out to be correct, but some turned out to be wrong too. Today, with access to more information, I am making a second attempt at demystifying ApplePay. This post is primarily a rehash of the original with only the relevant parts changed. Let’s get on with the article now…

When Apple announced ApplePay as a service on September 9th, 2014 and subsequently in their press release, they mentioned a few key terms like Secure Element, Tokens, One time unique number, Device account number, dynamic security code and such. Take a look at the 4th paragraph in their press release to see what I mean. For the layman, this could mean that apple has used some complex security technology to make ApplePay secure; but for some people in the field of mobile payments and security, it was not very clear what Apple was trying to say. So, let’s try and dissect that, shall we?

For simplicity, we are only going to discuss about ApplePay in the context of a payment made at a physical POS and not the mCommerce version of the service. This is only an educated attempt to understand the underlying implementation while the reality could well, be different.

Let’s start with the Secure Element (SE). ApplePay stores the payment credentials inside the SE. It does not store them in the cloud and it does not store them within the host operating system. This means that none of the iOS apps will have access to the payment information stored within the SE.

What exactly is stored in the SE?

When, you as a customer add a credit card to your Passbook (Mobile Wallet), the simplest thing for the wallet to do would be to store the real payment credentials like the Primary Account Number (PAN) into the SE. But that is a naive implementation and Apple does not do that. ApplePay instead stores something called a token and some associated data inside the Secure Element.

What is a token?

Token is like a fake credit card number that looks and feels like a credit card number for most intents and purposes, but it is not the real deal. During transaction authorization the token would be de-tokenized into the real PAN before passing on to the Issuer for authorization. The entity that places a request to de-tokenize differs depending on the tokenization standard used. In proprietary tokenization technologies, an Acquirer would be responsible for tokenization and de-tokenization. But, ApplePay uses the latest in tokenization standard created by EMVCo. In this case, the payment network performs de-tokenization.

How is a token provisioned to the SE?

Now that we know that a Token is stored in the SE, the next step is to find out how it gets provisioned there in the first place. There are many ways in which this could have been implemented and we will not know for sure until Apple announces its implementation. But, here is an educated guess I would go with…

When a customer adds a credit card to their wallet, the PAN details are submitted to ApplePay servers. ApplePay sends the information over to the appropriate payment network (Visa, Master Card or AMEX) asking for a Token in return. In this scheme of things, the payment network is said to play the role of a Token Service Provider (TSP) while ApplePay plays the role of a Token Requestor (TR).

The TSP in turn requests the appropriate card Issuer to perform Identification & Verification (ID&V) and/or out of band validation (OOB) to verify if the card is valid, if it is in good standing and if the request is originating from an authentic customer. After receiving a successful response from the Issuer, the TSP vaults the PAN, generates and maps it to a token and returns the token and a token-key back to ApplePay’s server. This token-key will later be used to generate a dynamic cryptogram at the SE. ApplePay, acting as its own Trusted Service Manager (TSM) provisions the token, token-key and maybe other data into the Secure Element. It is the Token that Apple calls as “Device Account Number” in its press release.

What happens when a payment transaction is initiated?

When a customer taps or waves their iPhone in front of a point of sale terminal, a payment transaction is initiated. ApplePay uses EMVCo’s Contactless suite of specifications to communicate with the contactless reader terminal. When it is time for the Secure Element to send information to the terminal, it does a couple of things. First, it identifies if the contactless terminal supports EMV Contactless or if it supports only Contactless MSD (for backwards compatibility).

If it supports EMV Contactless, the SE generates a dynamic cryptogram using a combination of the token, token-key, transaction amount, transaction counter etc. If the terminal supports only Contactless MSD, it generates a dynamic CVV instead, using similar data elements like token-key and other transactional data. Finally, it passes the token, the dynamic cryptogram (or the dynamic CVV) and other payment and chip data elements to the terminal in compliance with EMV Contactless specification.

Let’s stop for a moment here and review what just happened and compare that to Apple’s press release as quoted below.

“Each transaction is authorized with a one-time unique number using your Device Account Number and instead of using the security code from the back of your card, Apple Pay creates a dynamic security code to securely validate each transaction.”- From the press release

From the quote above, the Device Account Number represents the Token, the One-time Unique Number represents the dynamic cryptogram and the Dynamic Security Code represents the dynamic CVV.

What happens during a payment transaction?

The contactless terminal receives the token, dynamic cryptogram (or dynamic CVV) and other data elements according to the contactless EMV specification (or contactless MSD for backwards compatibility) and sends them over to the Acquirer. The Acquirer doesn’t know or care if the incoming PAN is a token PAN or the real PAN. They just identifiy the payment network based on the BIN and send it over the corresponding payment network.

The payment network identifies that it is a tokenized PAN and not a real PAN based on BIN tables. Consequently, they send a request out to the TSP to de-tokenize passing in the Token, the dynamic cryptogram (or dynamic CVV) and other transaction data elements. The TSP validates the cryptogram using the token-key that it shared earlier during the provisioning process. It also performs token channel validations and other configured domain control validations. If all the validations came out positive, the TSP de-tokenizes and returns the real PAN back to the payment network. The payment network attaches the real PAN to the authorization request and sends it over to Issuer for authorization.

The Issuer authorizes the transaction depending on the customer’s account status. The authorization response flows back from Issuer to the Payment network. The payment network removes the real PAN from the response and attaches token in its place before responding back to the Acquirer and back to the Merchant where your receipt gets printed.

In conclusion, we saw how ApplePay does provisioning and how a payment transaction is processed. For some of us this is good enough information to understand the security strategy used by ApplePay. But some others may have more questions. What happens when the Card is lost? What happens when the phone is lost? What happens when the merchant is compromised? How does ApplePay handle these challenges? These are all very good questions, but this post has already become too big. So, I will address those follow-up questions in my next post. Stay tuned!

Related Reading:


Apple Pay vs Google Wallet : Lost and Stolen Scenario

Note: You can read all articles in this series by visiting the Table of Contents

Both ApplePay and Google Wallet give very good attention to security. In fact we can even make a blanket statement that almost all mobile wallet services are at least slightly more secure than the traditional Magnetic Stripe cards, but to be honest, that is not a correct comparison. Today, we are trying to disrupt the payment industry through innovation and modern technology. In the process we should strive to achieve unprecedented levels of revolutionary security, not just an evolutionary next step.

ApplePay and Google Wallet are both focussed on achieving that. Both of them deal with security at all levels within the payment lifecycle without compromising convenience to the consumers. Today, let’s talk about some similarities and differences in their security strategy when it comes to Lost and Stolen devices.

Traditionally, when we lose our physical wallet, our immediate next step is to identify all the credit cards, debit cards and stored-value cards we had in that wallet, call the respective bank’s customer service phone numbers one by one and report it as lost or stolen. It is a tedious and very involved job that no one ever likes. Between the time we realize that our wallet was stolen and the time we report it to the Issuers, we can only hope that it has not been misused for fraud. Even after the card has been reported stolen, there is still a chance of misuse based on offline transactions that is common is some places. Liability clauses aside, it is the duty of the consumer to report any suspicious activity in their account and that is another painful task. Even if we assume that the consumer is fully protected, the fraud in general has taken place and someone in the payment ecosystem is bound to lose, not the fraudster.

Now, let’s consider the scenario where you have lost your Google Wallet equipped Android phone or an ApplePay equipped iPhone with multiple payment accounts stored inside it.

Unlike our physical wallet, which does not come with a lock and key, Google Wallet is protected by a PIN that only you know. In ApplePay, the wallet is protected using Touch ID (biometric fingerprint authentication), which only you have. A low-tech thief will not be able to breach even this first level of security. They will not be able to use any of the cards stored inside our wallet even though they have the wallet in their hands. I guess, they will just have to be happy with their new and shiny smartphone.

Once you realize that you have lost your phone, you don’t have to panic trying to remember all the cards you had inside it and trying to find their customer service numbers and so on. Of course, you have all the rights to be unhappy that you lost your expensive phone, but that is a different discussion. You can easily go to Google Wallet website and mark your wallet as lost or stolen with just a couple of clicks. Similarly, you can go to Apple’s iCloud website and put your phone in Lost mode. In both cases, if and when your phone comes online, it will immediately be placed in Lost mode.

For a moment let’s assume that the fraudster is not as low-tech as we thought and somehow circumvents the first level of security (PIN or Touch ID). Now that we have put the phone in lost mode, we have enabled the second level of security. In case of Google Wallet, the phone will refuse to make any payment transaction even if they hacked the PIN. In case of ApplePay, the tokens stored inside the embedded Secure Element will be erased thereby making it impossible to perform a payment transaction even if they have hacked the Touch ID. This second level of security makes the wallets doubly secure.

Once you have completed the above simple and straight-forward step, you are pretty much safe. You don’t even have to call your card issuer banks at all. In fact, you can continue to use your payment cards as usual without waiting for a new card to be posted via snail mail. This is pretty cool. But, just in case you want to be triply sure, you can always call your card Issuers in your leisure time and report them lost or stolen. If you do that, your physical cards will be blocked and you may have to wait for your new cards to be issued before making any new payment transaction. It is not necessary to perform this step, but it is always there if you need it.

Earlier, while discussing the lost mode for these mobile wallets, we blissfully ignored one important scenario. The lost mode can be communicated to your mobile wallet only if your phone is online. If your phone does not come online, neither Apple nor Google will be able to propagate the lost mode to their respective wallets. What if our high-tech thief makes sure that your phone does not go online after stealing it? Technically, this compromises the second level of security. If (a big If) they were also able to hack the first level of security (PIN or Touch ID), then it may seem that they are all set to steal our money. Let’s analyze this scenario in the context of ApplePay and Google Wallet.

In the case of ApplePay, the assumption is that, biometric fingerprint authentication is strong enough and cannot be broken. That is the reason why ApplePay does not allow for PIN based authentication of payment transactions because they consider it as technically less secure. In the rarest of scenarios where the fraudster is able to successfully crack the fingerprint auth and also successfully makes sure that the phone cannot be put into lost mode, then there is an open loop hole that can be exploited (unless I am missing something). In this scenario, we always have our last resort (third level of security) of locking our physical cards though.

In the case of Google Wallet, we cannot assume the PIN to be as strong as biometric fingerprint authentication. Moreover, it is also possible to configure Google Wallet such that it does not prompt for PIN for a certain time-period. This leaves a hole in security if your device is lost during that time-period. But, Google has one more trick up its sleeve. Unlike ApplePay, where a payment transaction never enters Apple’s servers, Google wallet’s cloud server does come into picture when a payment transaction is conducted. Google has to authorize a transaction in transit. So, technically, even if the fraudster does not allow the phone to go to lost mode and successfully cracks the PIN as well, at the end of the day, the transaction has to pass through Google wallet’s cloud servers. Since we have already placed the wallet in lost mode in the server (although it is not yet propagated to the physical phone), the transaction will be rejected by Google at the server side. The fraudster can do nothing but be shocked after all the hard work he has done trying to steal our money.

In conclusion, for lost/stolen device scenario both ApplePay and Google Wallet offer multiple layers of security. Some may consider ApplePay’s biometric auth to be more secure, while others will think that Google Wallet’s server side auth is a better strategy. Technically both are sound and revolutionary. We will just have to wait and see which one stands the test of time in the real-world.

Related Reading:

Mobile Payments: What is Apple Pay?

What is Apple Pay?

ApplePay is a mobile payment service developed by Apple and is scheduled to be operative starting October 20, 2014. It offers two different services and we will discuss them briefly here.

Service 1 – Pay in-store:

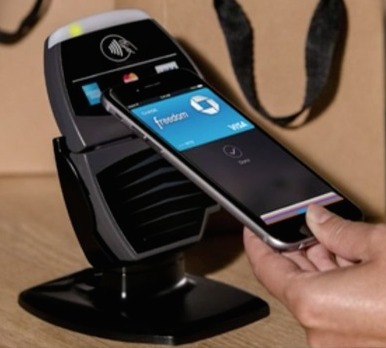
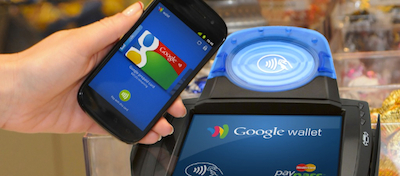
With this service you can use your NFC enabled iPhone 6 or iPhone 6 Plus or Apple Watch to purchase in-store by just tapping your phone against a contactless terminal and placing your fingers on the Touch ID. The contactless terminals are not Apple specific; they already exist in the wild and support contactless cards from Visa (PayWave) and MasterCard (PayPass). Apple just uses the same standard protocols used by the Contactless cards so as to be compatible with existing infrastructure.

apple-pay-pos

To support such in-store payments, ApplePay stores the necessary payment data inside a Secure Element embedded in the phone’s hardware itself. When you tap to pay, ApplePay uses Secure Element based card-emulation to transmit payment data to the contactless terminal. For a more detailed analysis of how ApplePay works behind the scenes, visit my blog post on Apple Pay – An Attempt to Demystify.

Beyond the basics, there are a few more interesting things that are unique to ApplePay. They are

  • Real payment card data is never stored inside the phone’s Secure Element. A token – based on EMVCo’s tokenization specification – is stored instead. This way, merchants will never have access to real card details and that relieves the consumer from the fear of merchants being hacked (like the recent Target and Home Depot data breaches). Moreover, when you lose the phone, you don’t have to replace the real card. We can just provision new tokens to a new phone and be done with it.
  • Every payment transaction is authenticated using Apple Touch ID (biometric fingerprint authentication). This is a very strong form of authentication, even better than the one offered by EMV based Chip n PIN cards.
  • Even if you don’t have an iPhone 6 or iPhone 6 Plus (which are the only Apple phones with NFC and Secure Element), you can still use ApplePay to pay at stores using a combination of Apple Watch and iPhone 5 or 5s.
  • Apple does not take part in the payment authorization process and does not store any transaction related information in their servers. They don’t store your payment card details either. They are very particular about this because they want the merchants to know that Apple is not a threat to them like other wallet providers are and they want the consumers to know that their data is safe with themselves.

 Service 2 – Pay in Mobile Apps:

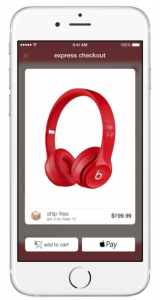
Using this service, you can pay for items from within mobile apps that support ApplePay. If you have ever used the iOS or OS-X keychain to store and auto-fill passwords, this will look very familiar. Participating mobile apps will show a button labelled Apple Pay. Checking out is as easy as tapping that button and placing your finger on the Touch ID.

apple-pay-app

Mobile Payments Blog Series

Welcome to the Mobile payments FAQ and not so FAQ series and you are on FAQ #17. The idea behind this series is to share and learn as much as possible about the field of mobile payments. If you like, you can read all of the FAQs by visiting the Table of contents page.

Related Reading

Mobile Payments: What is Google Wallet?

What is Google Wallet?

Google Wallet is a mobile/digital wallet developed by Google. Their grand vision probably is to replace the complete physical wallet with its virtual counterpart. They are not there yet, but in the process of marching towards their grand vision, they have created a few important services. We will discuss them one by one in a moment.

Google Wallet has been around since 2011 and has seen at least 3 major revisions. Each version had a very different technical approach to mobile payments mostly because of the politically difficult landscape that surrounds it. We will discuss each version, challenges faced and how they achieve mobile payments in separate posts later. In this post, we will assume the third (and latest) version of Google Wallet. This version was released along with Android Kit-Kat and it uses Host-based Card Emulation instead of Secure Element based Card Emulation.

As a consumer you can add your debit cards, credit cards, stored value cards, loyalty cards, gift cards etc. to your Google Wallet account either on their website or using the Google Wallet app on your smartphone. You may even add some money directly to your wallet account balance.

Pay at Physical POS:

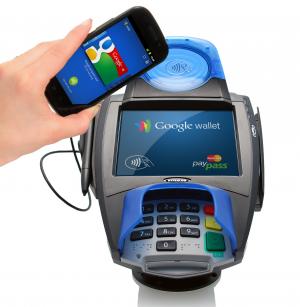
Using this service, you can use your NFC enabled Android phone to purchase in-store by just tapping your phone against a contactless terminal. The contactless terminals are not Google specific; they already exist in the wild and support contactless cards from Visa (PayWave) and MasterCard (PayPass). Google just uses the same standard protocols used by the Contactless cards so as to be compatible with existing infrastructure.

google-wallet-tap

Google has also developed a proprietary protocol on top of existing Contactless protocols to support making payments, redeeming coupons/offers and receiving loyalty all with just one tap. But for this to work, the merchants will have to upgrade their terminal to explicitly support Google’s own protocol.

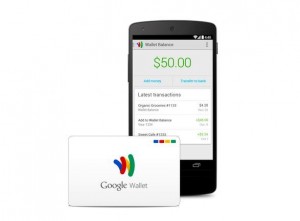
But there is a big challenge with contactless terminals. Today, they are not very common with retailers in the United States. Most of the retailers still have only traditional Magnetic Stripe terminals. Eventually, the expectation is that all merchants will have a contactless terminal, but in the meantime, we need a solution. To fill this gap, Google Wallet also offers a Debit card from MasterCard that has a Magnetic Stripe interface. So, if a merchant does not have a contactless terminal, you can still use the Google Wallet Debit card to make a payment.

google-wallet-debit-card

Pay Online:

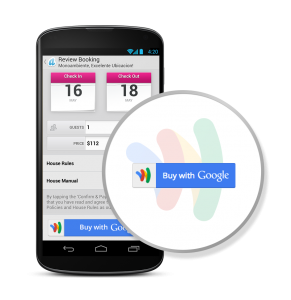
Using this service, you can pay on eCommerce websites and mobile apps where you see the Buy with Google sign. Here, Google Wallet acts more like a digital wallet than like a mobile wallet. Google offers different APIs for sale of digital goods and sale of physical goods. The difference is that, for sale of digital goods, a seller need not have a separate relationship with a payment processor. Google will take care of the payment processing as a whole. On the other hand, for sale of physical goods, a seller would need to have a payment processor and a merchant account with an Acquirer.

google-wallet-buy-with-google-2

Pay Friends:

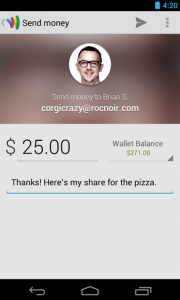
Using this service, you can use Google wallet to send money to anyone in the US with an email address. This service is generally used to pay friends, split bills and sometimes referred to as Person to Person payments or P2P for short. Recently, Google also added the ability to send money as an email attachment when using Gmail as the email provider.

google-wallet-pay-friends

Mobile Payments Blog Series

Welcome to the Mobile payments FAQ and not so FAQ series and you are on FAQ #16. The idea behind this series is to share and learn as much as possible about the field of mobile payments. If you like, you can read all of the FAQs by visiting the Table of contents page.

Related Reading

Apple Pay vs Google Wallet : The Secure Element

Note: You can read all articles in this series by visiting the Table of Contents

Both Google Wallet and ApplePay are trying to solve the same set of problems – mobile payments at the physical POS and inside apps. They have many characteristics that are very similar, but they also differ in significant ways when it comes to implementation and user experience. In this series of blog posts, we will analyze a few similarities and differences one by one. We will start by talking about the Secure Element today.

A Secure Element (SE) securely stores card/cardholder data and does cryptographic processing. During a payment transaction it emulates a contactless card using industry standard protocols to help authorize a transaction. The Secure Element could either be embedded in the phone or embedded in your network operator’s SIM card. We will generically refer to them as device-based Secure Element. More recently, with the introduction of HCE technology by Google, the definition of Secure Element has been expanded to include a secure cloud as well. We will refer to them as cloud-based Secure Element.

In the beginning, Google Wallet v1.0 started its journey by using the device-based Secure Element for card emulation. This approach didn’t work out well for Google as most of the major network operators (Verizon, AT&T and T-Mobile) decided to support their own brand of wallet called Softcard (previously Isis) and blocked access to the Secure Element for any other wallet providers. Google had no choice but to move on.

se-hce-dual-ce

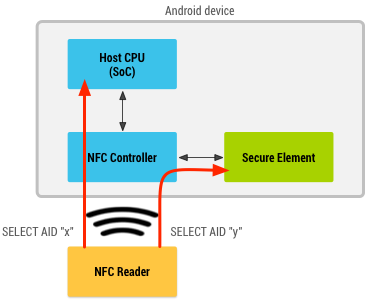
Today, Google wallet v3.0 does not use a device-based Secure Element. It uses a technology called Host-based card emulation (HCE) instead, where card-emulation and the Secure Element are separated into different areas. For example, in HCE mode, when an NFC enabled Android phone is tapped against a contactless terminal, the NFC controller inside the phone redirects communication from the terminal to the host operating system. Google wallet picks up the request from the host operating system and responds to the communication with a virtual card number and uses industry standard contactless protocols to complete the transaction. This is the card-emulation part. The transaction proceeds and reaches the Google cloud servers where the virtual card number is replaced with real card data and authorized with the real Issuer. Since the real card data is securely stored in Google’s cloud servers, the cloud represents the Secure Element part. In general, this approach is considered less secure compared to the embedded SE approach. But there are some areas (like Lost & Stolen use-case) where it is more secure. We will discuss that in a different post.

NOTE: This doesn’t mean that Android operating system does not support device-based Secure element anymore. In fact it supports both device-based Secure Element and HCE using a routing table at the NFC controller level.

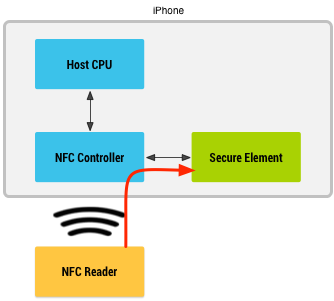
ApplePay, in contrast, works using traditional device-based Secure Element. It does not use HCE technology. Consequently, Apple does not store the real card or token data in their cloud servers at all. The on-device Secure Element essentially performs card-emulation in addition to secure storage. It sends payment data to the contactless terminal when you Tap & Pay. I have attempted to demystify how ApplePay works in one of my previous posts. In many ways it is similar to how Google Wallet v1.0 used to work (with some important differences).

se-ce-iphone

First, ApplePay does not store the real card data inside the SE. This is in direct contrast to Google Wallet 1.0 and Softcard. Instead, they store a token that conforms to EMVCo tokenization specification. It is this token (along with a cryptogram) that gets sent to the contactless terminal. During the authorization flow, the card network identifies the token, de-tokenizes them into real PAN with the help of a Token Service Provider (TSP) and sends the real PAN over to Issuer for authorization.

Second, Apple owns and controls the Secure Element embedded inside the device thereby avoiding unnecessary challenges from the MNOs.

Finally, Apple significantly simplified the provisioning model. If they had to provision the real card details, they would have to depend on a complex and convoluted process. Fortunately, they provision a token instead and took the opportunity to simplify the process to a bare minimum.

In the next post, we will discuss how these two services differ when the device is lost or stolen.

Related Reading:

Apple Pay – An attempt to demystify

Update as of Jan 3, 2015

This post was written in the early days after ApplePay’s announcement, when most of us didn’t have access to enough information on its inner workings. Even with such limited information, many parts of the post turned out to be correct, but some turned out to be wrong too. Consequently, I have taken a second attempt at demystifying ApplePay in this other post based on what we know at this time. The rest of this post is not modified.

When Apple announced ApplePay as a service on September 9th, 2014 and subsequently in their press release, they mentioned a few key terms like Secure Element, Tokens, One time unique number, Device account number, dynamic security code and such. Take a look at the 4th paragraph in their press release to see what I mean. For the layman, this could mean that apple has used some complex security technology to make ApplePay secure; but for some people in the field of mobile payments and security, it was not very clear what Apple was trying to say. So, let’s try and dissect that, shall we?

For simplicity, we are only going to discuss about ApplePay in the context of a payment made at a physical POS and not the mCommerce version of the service. This is only an educated attempt to understand the underlying implementation while the reality could well, be different.

Let’s start with the Secure Element (SE). ApplePay stores the payment credentials inside the SE. It does not store them in the cloud and it does not store them within the host operating system. This means that none of the iOS apps will have access to the payment information stored within the SE.

What exactly is stored in the SE?

When, you as a customer add a credit card to your Passbook (Mobile Wallet), the simplest thing for the wallet to do would be to store the real payment credentials like the Primary Account Number (PAN) into the SE. But that is a naive implementation and Apple does not do that. ApplePay instead stores something called a token and some associated data inside the Secure Element.

What is a token?

Token is like a fake credit card number that looks and feels like a credit card number for most intents and purposes, but it is not the real deal. During transaction authorization the token would be de-tokenized into the real PAN before passing on to the Issuer for authorization. The entity that places a request to de-tokenize differs depending on the tokenization standard used. In proprietary tokenization technologies, an Acquirer would be responsible for tokenization and de-tokenization. But, ApplePay uses the latest in tokenization standard created by EMVCo. In this case, the payment network performs de-tokenization.

How is a token provisioned to the SE?

Now that we know that a Token is stored in the SE, the next step is to find out how it gets provisioned there in the first place. There are many ways in which this could have been implemented and we will not know for sure until Apple announces its implementation. But, here is an educated guess I would go with…

When a customer adds a credit card to their wallet, the PAN details are submitted to ApplePay servers. ApplePay sends the information over to the corresponding Issuer bank asking for a Token in return. The Issuer bank calls a Token Service Provider (TSP) and requests for a token. As far as I know, the payment network themselves play the role of TSP at present.

The TSP vaults the PAN, maps it to a token and returns the token and a token-key. This token-key will later be used to generate a dynamic cryptogram at the SE. The Issuer receives a token and token-key, and adds a cvv-key to the mix. The cvv-key will be later used to generate a dynamic security code at the SE. The Issuer returns the token, token-key and cvv-key back to ApplePay. ApplePay, acting as its own Trusted Service Manager (TSM) provisions the token, token-key, cvv-key and maybe other data into the Secure Element. It is the Token that Apple calls as “Device Account Number” in its press release.

What happens when a payment transaction is initiated?

When a customer taps or waves their iPhone in front of a point of sale terminal, a payment transaction is initiated. ApplePay uses EMVCo’s Contactless suite of specifications to communicate with the contactless reader terminal. When it is time for the Secure Element to send information to the terminal, it does two things. First, it generates a dynamic cryptogram using a combination of the token, token-key, transaction amount, transaction counter etc. Second, it generates a dynamic CVV value using the cvv-key. Finally, it passes the token, the dynamic cryptogram, the dynamic CVV and other payment and chip data elements to the terminal using the EMV specification.

Let’s stop for a moment here and review what just happened and compare that to Apple’s press release as quoted below.

“Each transaction is authorized with a one-time unique number using your Device Account Number and instead of using the security code from the back of your card, Apple Pay creates a dynamic security code to securely validate each transaction.”- From the press release

From the quote above, the Device Account Number represents the Token, the One-time Unique Number represents the dynamic cryptogram and the Dynamic Security Code represents the dynamic CVV.

What happens during a payment transaction?

The contactless terminal receives the token, dynamic cryptogram, dynamic CVV and other data elements according to the contactless EMV specification (or contactless MSD for backwards compatibility) and sends them over to the Acquirer. The Acquirer doesn’t know or care if the incoming PAN is a token PAN or the real PAN. They just identifiy the payment network based on the BIN and send it over the corresponding payment network.

The payment network identifies that it is a tokenized PAN and not a real PAN based on BIN tables. Consequently, they send a request out to the TSP to de-tokenize passing in the Token and the dynamic cryptogram. The TSP, among other things, validates the cryptogram using the token-key that it shared earlier during the provisioning process. If the cryptogram is valid, the TSP de-tokenizes and returns the real PAN back to the payment network. The payment network attaches the real PAN to the authorization request and sends it over to the Issuer for authorization.

The Issuer validates the dynamic CVV based on the cvv-key it shared earlier during the provisioning process. Then it authorizes the transaction depending on the customer’s account status. The authorization status flows back from the Issuer to the Payment network, back to the Acquirer and back to the Merchant where your receipt gets printed.

In conclusion, we saw how ApplePay does provisioning and how a payment transaction is processed. For some of us this is good enough information to understand the security strategy used by ApplePay. But some others may have more questions. What happens when the Card is lost? What happens when the phone is lost? What happens when the merchant is compromised? How does ApplePay handle these challenges? These are all very good questions, but this post has already become too big. So, I will address those follow-up questions in my next post. Stay tuned!

Reprinted from my own article here

Related Reading:


Mobile Payments: What is HCE?

What is HCE?

Previously, we discussed about Secure Element and how it enables payment transactions in card-emulation mode. We also briefly discussed that SE is not the only choice available. Today, we also have HCE as an alternative. HCE stands for Host-based Card Emulation. As its name suggests, it has something to do with card-emulation mode. But what does host-based mean? Before we talk about what host-based means, let’s review how things were before HCE.

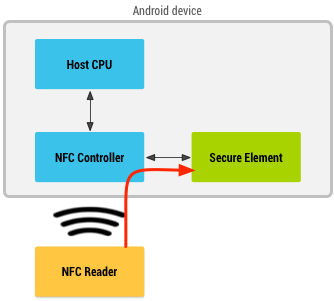
Prior to HCE, the only way to emulate a card using a mobile NFC device was to use a Secure Element. Let’s take the Android platform as an example. Here, the host operating system (Android in this case) and its apps do not get involved with a payment transaction at all.

se-ce

When a consumer holds the device over an NFC terminal, the NFC controller in the device routes all data from the reader directly to the Secure Element. The Secure Element itself performs the communication with the NFC terminal, and no Android application is ever involved in the transaction. After the transaction is complete, an Android application can query the Secure Element directly for the transaction status and notify the user. This is the approach used by ApplePay as well

This SE based approach is inherently secure and that is a very big advantage. But, there are some downsides too. The SE owner owns the key to the kingdom. All others will have to go through complex business models, partnerships, and dependencies to gain access and it makes the whole process that much more complex and expensive. Moreover, the SE itself has only limited storage capacity and processing speed.

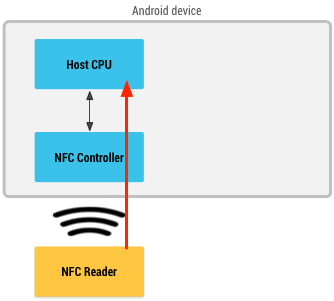
The alternative is to use Host-based Card Emulation. Here, the host operating system (Android) and its apps gets involved with a payment transaction.

hce-ce

When a consumer holds the device over an NFC terminal, the NFC controller in the device routes all data from the reader directly to the Host CPU on which Android applications are running directly. Then, an Android application (a Mobile Wallet) that deals with a particular payment application can do its magic and provide for the card emulation requests and responses.

Since the host CPU is inherently insecure, any mobile wallet worth its salt will not store the real payment credentials inside the phone. Google Wallet for example moves all such data to a hosted cloud environment, and that is where the secure storage and secure processing takes place. In essence, we have moved the Secure Element from inside a chip to a cloud environment (HCE Cloud) instead.

This approach has its downsides – like security and a need for data connection. This does not mean that your private information is vulnerable. We can still have a very high degree of security using other technologies. Payment card Tokenization is one of them and we will discuss it in an upcoming post. On the bright side, the complex business models, partnerships and access restriction to SE can be dramatically simplified. This enables payment application issuers to easily provision to the cloud and get it over with.

Using SE-based Card Emulation and Host-based Card Emulation is not an either-or scenario though. Android allows both to co-exist in the same NFC enabled device and offers tools and technologies to work with both of them as shown in the diagram below.

se-hce-dual-ce

All the above diagrams were taken from Android developers website.

Mobile Payments Blog Series

Welcome to the Mobile payments FAQ and not so FAQ series and you are on FAQ #15. The idea behind this series is to share and learn as much as possible about the field of mobile payments. If you like, you can read all of the FAQs on the Mobile Payments category or by visiting the Table of contents page.

Related Reading

Mobile Payments: What is a Secure Element?

What is a Secure Element (SE)?

GlobalPlatform defines Secure Element (SE) as a tamper-resistant platform capable of securely hosting applications and their confidential and cryptographic data in accordance with the rules and security requirements set forth by a set of well-identified trusted authorities. Put simply, a Secure Element can be considered to be a chip that offers a dynamic environment to store data securely, process data securely and perform communication with external entities securely. If you try to mess with it by tampering in any form, it may self-destruct, but will not allow you to gain unauthorized access.

While not all NFC applications require security, those that involve financial transactions do. The Secure Element resides in highly secure cryto chips. It also provides delimited memory for each application stored in it and other functions that can encrypt, decrypt and sign the data packet.

In today’s smartphones, a Secure Element can be found as a chip embedded directly into the phone’s hardware, or in a SIM/UICC card provided by your network operator or in an SD card that can be inserted into the mobile phone.

To put things into context, when you are using an NFC enabled mobile device to Tap & Pay, the NFC controller goes into card-emulation mode. The NFC controller itself does not deal with the data or processing associated with the payment transaction. It is just an interface that allows communication using standard protocols.

It is the Secure Element that actually emulates the contactless card. It performs handshake with the terminal, sends the right responses to the right queries, generates dynamic cryptograms, authenticates the stored card and so on.  To take it a step further and be even more accurate, it is not the Secure Element that emulates the card. The software that emulates a contactless card is the one that is stored inside the secure element in the form of payment applications or applets. The Secure Element provides secure storage and execution environment for the payment applications to do its job.

Secure Element is not a necessity to emulate contactless cards although it is the most secure to date. An alternative is to use Host-based Card Emulation (HCE) which moves the secure storage and execution environment to the cloud instead of the Secure Element. We will discuss HCE next.

Mobile Payments Blog Series

Welcome to the Mobile payments FAQ and not so FAQ series and you are on FAQ #14. The idea behind this series is to share and learn as much as possible about the field of mobile payments. If you like, you can read all of the FAQs on the Mobile Payments category or by visiting the Table of contents page.

Mobile Payments: What is NFC Card Emulation Mode?

What is NFC Card Emulation Mode?

An NFC enabled device can operate in three different modes – reader/writer mode, peer-to-peer mode and the all important card-emulation mode.

In Reader/Writer mode, an NFC device behaves as a reader for NFC tags, such as the contactless smart cards and RFID tags. It detects a tag immediately in close proximity by using collision avoidance mechanism. Once detected, it can either read data from or write data to the detected tag. Smart posters are an important application for this mode.

In Peer-to-Peer mode, two NFC enabled devices can exchange information between each other. This is the mode used by Android Beam technology. Exchanging photos, business cards and money transfer between friends are some of the applications for this mode.

In Card-emulation mode, an NFC device behaves like a contactless smart card. In this mode, the mobile phone does not generate its own RF field; the NFC reader creates this field instead. So, as long a mobile platform supports the emulation of protocols surrounding ISO/IEC 14443 that regular contactless cards use, we should be good. Both Android and Blackberry does that and can therefore be used to emulate contactless cards. In this mode, we can use our mobile phone in place of credit cards, debit cards, transit cards, access cards and so on.

Mobile Payments Blog Series

Welcome to the Mobile payments FAQ and not so FAQ series and you are on FAQ #13. The idea behind this series is to share and learn as much as possible about the field of mobile payments. If you like, you can read all of the FAQs on the Mobile Payments category or by visiting the Table of contents page.

Mobile Payments: What is NFC?

What is NFC?

NFC stands for Near Field Communication. It is a standard defined by the NFC Forum, a global consortium of hardware, software, credit-card, banking, network-providers and others who are interested in the advancement and standardizing this technology. As the name implies, it’s a set of short-range wireless communication standards used in mobile phones and other electronic devices. It operates on the frequency of 13.56 MHz with data transfer of up to 424 kilobits per second.

NFC and RFID (Radio Frequency Identification) are sometimes used interchangeably, but NFC is really a newer version or extension of RFID. RFID waves can have very long ranges as they are generally used in manufacturing, inventory and object tracking. In contrast, NFC limits the range of communication to within 2 to 4 inches. This makes NFC more suitable for secure applications like payments.

NFC allows you to share small payloads of data between an NFC tag and an NFC enabled phone or between two NFC enabled phones. This may sound more like Bluetooth because it is also a communication technology between two bluetooth enabled devices over a short range. Yes, they are similar in that aspect, but they are also different in other aspects. For instance, NFC doesn’t need a pairing process; it can read from passive NFC tags; it consumes low power; it connects to its target very quickly ( one tenth of a second) etc. These qualities make NFC a good candidate for mobile payments. Bluetooth has other advantages that makes it a better choice for a different set of use cases. We will discuss about Bluetooth, BLE and Beacons in a different post.


Contactless cards, that we discussed in an earlier post, behave like NFC tags and emit NFC style radio frequency signals when provoked by a contactless reader terminal. So, in theory, a mobile phone with an NFC controller can do the same as long as they conform to the protocols defined by payment networks. And that is exactly what is happening when you use a Google or Isis wallet. We will discuss how this happens in practice in an upcoming post on card-emulation mode for NFC.

So, can you just replace all of your contactless credit and debit cards with Google wallet or Isis wallet and call it a day. Not yet. There are a couple of reasons for that.

First and foremost, today, contactless terminals/readers are not plentiful. There are just over 200K contactless terminals across US. The advantage of using your contactless plastic card is that it also comes with a magstripe for backward compatibility with traditional terminals. We do not have that luxury with an NFC enabled phone.

Second, provisioning a contactless application to an NFC enabled phone is a much more complicated process involving a larger ecosystem of participants like SP TSM, SE TSM, MNO, Issuing banks and the complexity involved with security, key management and over-the-air provisioning cannot be discounted either. Technically, these have been solved, but not all Issuing banks are ready to invest in it yet. That said, the industry is slowly, yet steadily moving towards a digital wallet. So, it is going to happen sooner rather than later, but don’t hold your breath.

Mobile Payments Blog Series

Welcome to the Mobile payments FAQ and not so FAQ series and you are on FAQ #12. The idea behind this series is to share and learn as much as possible about the field of mobile payments. If you like, you can read all of the FAQs on the Mobile Payments category or by visiting the Table of contents page.